Blog

  • Avoid MacOS Time Machine issues with Ubuntu SMB by Separating Users

    Avoid MacOS Time Machine issues with Ubuntu SMB by Separating Users

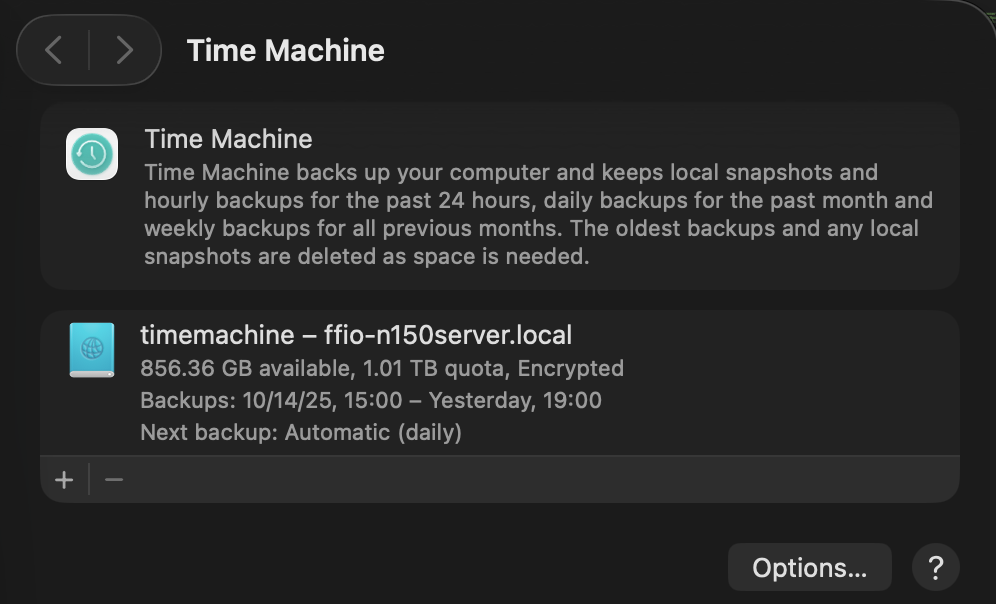
    Warning: Manage SMB users carefully.

    Using Time Machine along with SMB shares seems to cause an issue when the backup runs the other SMB shares stop working. What is likely happening is MacOS is locking the files as it starts the backup to avoid read write problems.

    Separating the users, as in having one SMB user for files sharing and a second for Time Machine seems to solve the issues.

    Fortunately, setting up an SMB share for Time Machine is pretty straightforward and developer Marinus Klasen has a great guide. I’ve simplified what is needed an added it below at the bottom. General steps.

    1. First, create the users and set up the disks on Ubuntu. Add 2 SMB users (guide on that below.)
    2. Update the Ubuntu’s SMB settings.
    3. Set up Time Machine on MacOS before connecting to SMB shares. The share you’re looking to use should show in the list.
    4. Connect to your other SMB shares and go!

    There’s a great quick guide on ask Ubuntu about adding a CLI only SMB user on Ask Ubuntu.

    ## For TimeMachine Config ##
    # Fruit global config
      fruit:aapl = yes
      fruit:nfs_aces = no
      fruit:copyfile = no
      fruit:model = MacSamba
    
    [timemachine]
       # Load in modules (order is critical!)
       vfs objects = catia fruit streams_xattr
       fruit:time machine = yes
       fruit:time machine max size = 1.5T
       comment = Time Machine Backup
       path = /TimeMachine (CHANGE THIS)
       available = yes
       valid users = timemachine (Maybe don't permit other SMB users.)
       browseable = yes
       guest ok = no
       writable = yes

    Ask Ubuntu

    Updated and Retried with Ubuntu 25.04 and MacOS Tahoe 26.0.1: 11/19/25

  • Simple Camera Projection in Blender (Testing Version 01)

    Simple Camera Projection in Blender (Testing Version 01)

    Camera Mapping and Image Projection are very common in 3D to either alter a 3D space with a photo or match digital elements to a photo. There are probably better ways to do this but parenting an object to a camera isn’t a bad start. Map a texture to a plane, parent the plane to the camera, and update the camera focal length to the photo. Simple, probably still had some distortion but workable for a quick pass.

    Quick Texture Settings

    Add an image, alpha, make sure to set the alpha blend.

    Parent the Plane to the Camera

    Placing the image right up against the camera makes it easier to remove distortion later.

    Move the Camera into Place

    Here’s the tricky part. Any difference in the object size, focal length, or other camera distortion will stand out quickly but, unless the goal is a final render, the projection can be helpful for a simple design or setup.

    Ultimately the design doesn’t work but building the quick projection at least helped vet out the idea. While using an object for the camera projection allows for some great customization, there are probably some better methods using UV projection.

  • Blender Network Rendering: Revisited – Prism

    Blender Network Rendering: Revisited – Prism

    Almost 10 years ago I built a small basement render farm with a few spare PCs to speed up renders. However, planning and pre-production ended up being far more difficult than rendering. Since I’ve returned to animation I’ve mostly been working in 2D, which is far less render intensive, but a recent 3D project revived my research into ways to use multiple systems to speed up Blender output. The first option I tried, Prism, ended up not being a system manager, as Blender’s previous Network Render panel was, but an entire pipeline manager with some helpful render options built in.

    Installing Prism on Windows 10 was mostly straightforward, download from the site, run the .exe install, add your name when it asks, start a project, and in Prism Settings -> DCC apps add Blender. (Reading the manual is definitely recommended.) A few important notes:

    1. Read the manual, saying it again. This is an entire pipeline manager, by it’s nature, it can’t be simple.
    2. When setting up a project, put it in a syncing app such as Dropbox, Creative Cloud Files, or a Network Drive. You probably already have project files syncing but having the pipelines open right away on 2 systems was immediately satisfying.
    3. I had trouble with the Blender 2.8.3 connection not installing a Python Library. I installed Prism to Program Files (x86) instead of the default /prism directory which may cause permissions issues. To remedy this, I manually downloaded the install .zip and copied the Python 3.7 libs into the /prism/pythonlibs/python37. It will still probably bring up the install prompt in Blender, let it run, after that should work. (The auto-install prompted in Blender would present a permissions error.)
    4. Speaking of permissions, Windows smartshield complains from install to each run. Not much to do here but be aware.

    After adding a project, the power comes in when going into the assets, or shots, adding a scene, then creating multiple render or playblast tasks. From there the render tasks can run on the machine of choice. While it’s helpful to have multiple CPUs or GPUs tied in together handing off tasks, this management immediately can help even single shot projects by allowing for multiple output settings and a tracker for those tasks.

    Oh, and the same folks have a Renderfarm Manager named Pandora. I think that’s what I meant to download.

  • Why use SQLite with Laravel

    At first, it wasn’t immediately obvious why to use SQLite, over MySQL, with Laravel but a couple good cases have come up.

    1. For AnimaticBuilder, since a robust user database setup isn’t needed just yet, SQLite works great since it’s fast, portable, and easily versioned. Even later, when a user database is needed, individual SQLite databases could be used for sequences.
    2. On Laracasts, folks have pointed out how to use the SQLite as the database for test cases, https://laracasts.com/discuss/channels/testing/how-to-specify-a-testing-database-in-laravel-5. Here too, the database can continue to be used as a test bed through the development of an app. (Just make sure nothing secure gets saved there.)
  • WordPress 4.4 Sidebar Naming

    With WordPress 4.4 rolling out a few issues have come up around sidebars and widgets but one fix is not immediately obvious. When adding a sidebar, the naming previously was not case sensitive but it is now. The example below would not work:

     register_sidebar(array(
     'name'=>'Homepage Widget',
     'description' => 'Main Area on the Homepage',
     'id' => 'homepage',
     'before_widget' => '',
     'after_widget' => '',
     ));
    <?php if (!dynamic_sidebar('HomePage')) : ?>
    <?php endif; ?>
    

    Now, make sure that the sidebar call uses the exact ID.

    <?php if (!dynamic_sidebar('homepage')) : ?>
    <?php endif; ?>
  • Want to learn Laravel? Tear apart Illuminate

    There are any number of ways to learn Laravel. From the documentation right on laravel.com to the very complete tutorials over at Laracasts.com but there is also great way to learn the basics bundled in the install. Navigate to /vendors/laravel/src/framework/illuminate and dig into the modules that form the key functionality included in the original configuration.

    Each one of these modules is registered in the app/config and, since Laravel 5, they now reside in the vendors directory leaving the app directory fairly spartan. Spartan is good but figuring out how the original functionality by looking through that directory is a bit tricky.

    The vendors directory holds all packages added to the base install as well as holding the core packages in /vendors/laravel/src/framework/illuminate. By opening up /illuminate you can look through, and learn from, a number of packages including:

    1. Hashing, great for learning simple service provider setup.
    2. View, which has some pieces in the app directory as well and covers middleware.
    3. Authentication was added as core functionality and has a number of working parts good to explore.